Als ik XAMPP gebruik voor lokaal werk aan PHP scripts, schakel ik telkens de Xdebugger aan en uit vanwege de vertraging van PHP door Xdebug. Als ik geen foutopsporing nodig heb, schakel ik Xdebug geheel uit.
Er zijn goede aanbevelingen voor het versnellen van PHP bij gebruik van Xdebug, bijvoorbeeld hier en hier. Desondanks schakel ik Xdebug liever helemaal uit.
Omdat ik in een Windows omgeving werk, schreef ik twee batch-bestanden die ik in de XAMPP directory plaats naast de bestaande batch-bestanden van XAMPP, apache_start.bat en apache_stop.bat.
Het eerste script, apache_debug.ps1 start Apache op met actieve debugger. Dit doet hij door een blok met Xdebug instellingen in het PHP.ini bestand te injecteren, vlak voordat Apache wordt opgestart.
Het tweede script herstart Apache zonder actieve debugger. Hier wordt het blokje Xdebug instellingen in commentaar verstopt, voordat Apache opstart.
Voor het gemak heb ik ook een derde script dat de huidige debugstatus meldt. Soms vergeet ik of de debugger aan staat.
Alle scripts werken ook al Apache als service draait.
Installeren
Kopieer de drie scripts naar de map met de XAMPP installatie, standaard is dat C:\XAMPP. Als XAMPP zich ergens anders bevindt, pas dan de $xamppDir declaratie aan die aan het begin van de scripts staat.
Gebruik:
Voer de scripts uit vanuit een terminal venster. Of gebruik onderstaande automatisering.
Optionele verbetering:
Gebruik eventueel deze VS Code integratie:
Om VS Code de debugger automatisch aan en uit te laten schakelen, kunnen de volgende twee .vscode/tasks.json worden toegevoegd:
1. Add two shell tasks in `.vscode/tasks.json`:
– één taak om `apache_debug.ps1` uit te voeren voor foutopsporing begint;
– één taak om `apache_restart.ps1` uit te voeren na de foutopsporing.
2. Zorg ervoor dat deze taken worden uitgevoerd in PHP-debug configuratie in `.vscode/launch.json` door gebruik te maken van:
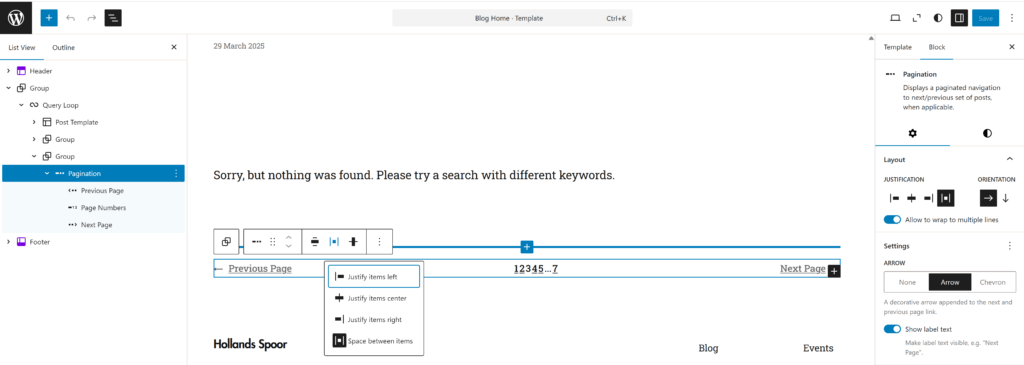
Samenvatting: een gebruikelijke manier om paginering weer te geven is om de link ‘vorige pagina’ aan de linkerkant van de bladspiegel uit te lijnen, de link ‘volgende pagina’ aan de rechterkant en de pagina nummers ergens in het midden. Dit kan bereikt worden door in de taakbalk van het paginering-blok te kiezen voor ‘Wijzig uitvulling van items’ en dan voor ‘Afstand tussen items’. Deze layout houdt evenwel geen stand als de eerste of laatste pagina van de Query loop bereikt wordt. Dan worden de elementen ‘vorige pagina’ respectievelijk ‘volgende pagina’ niet weergegeven en zal de uitlijning van de items plotseling veranderen. In deze notitie worden twee pragmatische oplossingen voorgesteld.
Het Gutenberg paginering-blok kan in een Query loop-block worden opgenomen en bevat zelf drie blokken: een blok dat een link toont naar de vorige pagina, een blok met een link naar de volgende pagina en een blok met pagina nummers. De blokken ‘vorige’ en ‘volgende’ kunnen een pijl tonen, een tekst of allebei.
Een voor de hand liggende weergave hiervan is om de pijl naar links uit te lijnen met de linkermarge, de pijl naar rechts met de rechtermarge en de paginanummers er in het midden tussen te zetten. Om dat te bereiken kies je in de taakbalk van het paginering-blok voor ‘Wijzig uitvulling van items’ en vervolgens voor ‘Afstand tussen items’.
Dit werkt, maar deze uitlijning houdt geen stand op de eerste en laatste pagina van de getoonde berichten. Dit komt doordat het blok ‘Vorige pagina’ niet als een leeg item wordt getoond als er geen vorige pagina is, maar in het geheel niet. Dan heeft het paginering-blok opeens nog maar twee items en die worden dan anders uitgevuld: de paginanummer verhuizen naar de linkermarge.
Ikzelf vind het in de meeste gevallen wenselijk dat die navigatie-elementen op een vaste plaats blijven staan en niet verspringen als je bladert.
Een eerste gedachte om dit te bereiken was om de drie sub-blokken van het paginering-blok los te gebruiken. Ik maakte een kolom-blok met drie kolommen met de bedoeling in iedere kolom een van de paginering-elementen te plaatsen. Op die manier zou, bij afwezigheid van een van de paginering-elementen, de layout in stand blijven want de kolommen blijven op hun plaats.
Ik nam daarbij aan dat deze sub-blokken zelfstandig kunnen functioneren doordat ze hun context ontvangen van het Query-loop block. Helaas bleek het niet mogelijk de paginering-onderdelen los te gebruiken.
In het block-metabestand (block.json) van het query-pagination-previous blok is te zien dat alleen het pagination blok is toegestaan als moederblok:
Je kunt het Vorige-pagina blok niet het paginering-blok uit slepen naar bijvoorbeeld een leeg kolom-blok of naar een ander blok om de positie te fixeren.
Oplossing 1
Je kunt sub-blokken dus niet van het paginering-blok naar een ander blok slepen, maar je kunt wel zo’n sub-blok verwijderen. Daarnaast kun je meerdere paginering-blokken per pagina plaatsen. Wat je kunt doen is dus drie paginering-blokken met daarin telkens alleen maar één van de drie sub-blokken. Dus een paginering blok waarin ‘paginanummers’ en ‘volgende pagina’ zijn verwijderd. Een paginering-blok waarin alleen ‘volgende pagina’ is blijven staan en een paginering-blok met alleen de pagina-nummers. Deze drie pagineringblokken kun je vervolgens in een rij plaatsen en op de gewenste manier uitvullen.
Ik heb niet onderzocht wat de server-belasting van deze oplossing is, waarschijnlijk niet eens zo hoog want de paginering-blokken zijn onderdeel van één en hetzelfde query loop-block. Er zal niet telkens een nieuwe query worden gedaan. Het is geen elegante oplossing, maar het werkt.
Oplossing 2
De blokken ‘vorige pagina’ en ‘volgende pagina’ leveren bij de render-functie van WordPress lege inhoud op als ze niet van toepassing zijn. Maar na de render-functie wordt alle resulterende inhoud wel door een aantal filters gehaald, óók als die inhoud leeg is.
Een filter toevoegen aan het render-resultaat van de sub-blokken maakt het mogelijk om in plaats van lege inhoud, een leeg, plaatsvervangend element aan het paginering-blok toe te voegen. Voor het gemak kan dan wat inline-style worden toegevoegd om de marges in overeenstemming met het oorspronkelijk blok te houden. Dit kan natuurlijk ook bereikt worden door wat class-namen en css toe te voegen *
Aangezien het hier om een vorm-aanpassing gaat, ligt het voor de hand deze filters aan het thema toe te voegen, dus in functions.php of bestand dat daardoor wordt aangeroepen.
Conclusie
Twee pragmatische oplossingen: een waarbij geen code hoeft te worden toegevoegd en een die wat minder belastend is en die de opmaak in de blok-editor wat rustiger houdt.
* Je kunt copilot hierom vragen maar dat heb ik ook al gedaan. Ik kreeg er wat toegankelijkheids verbetering bij cadeau:
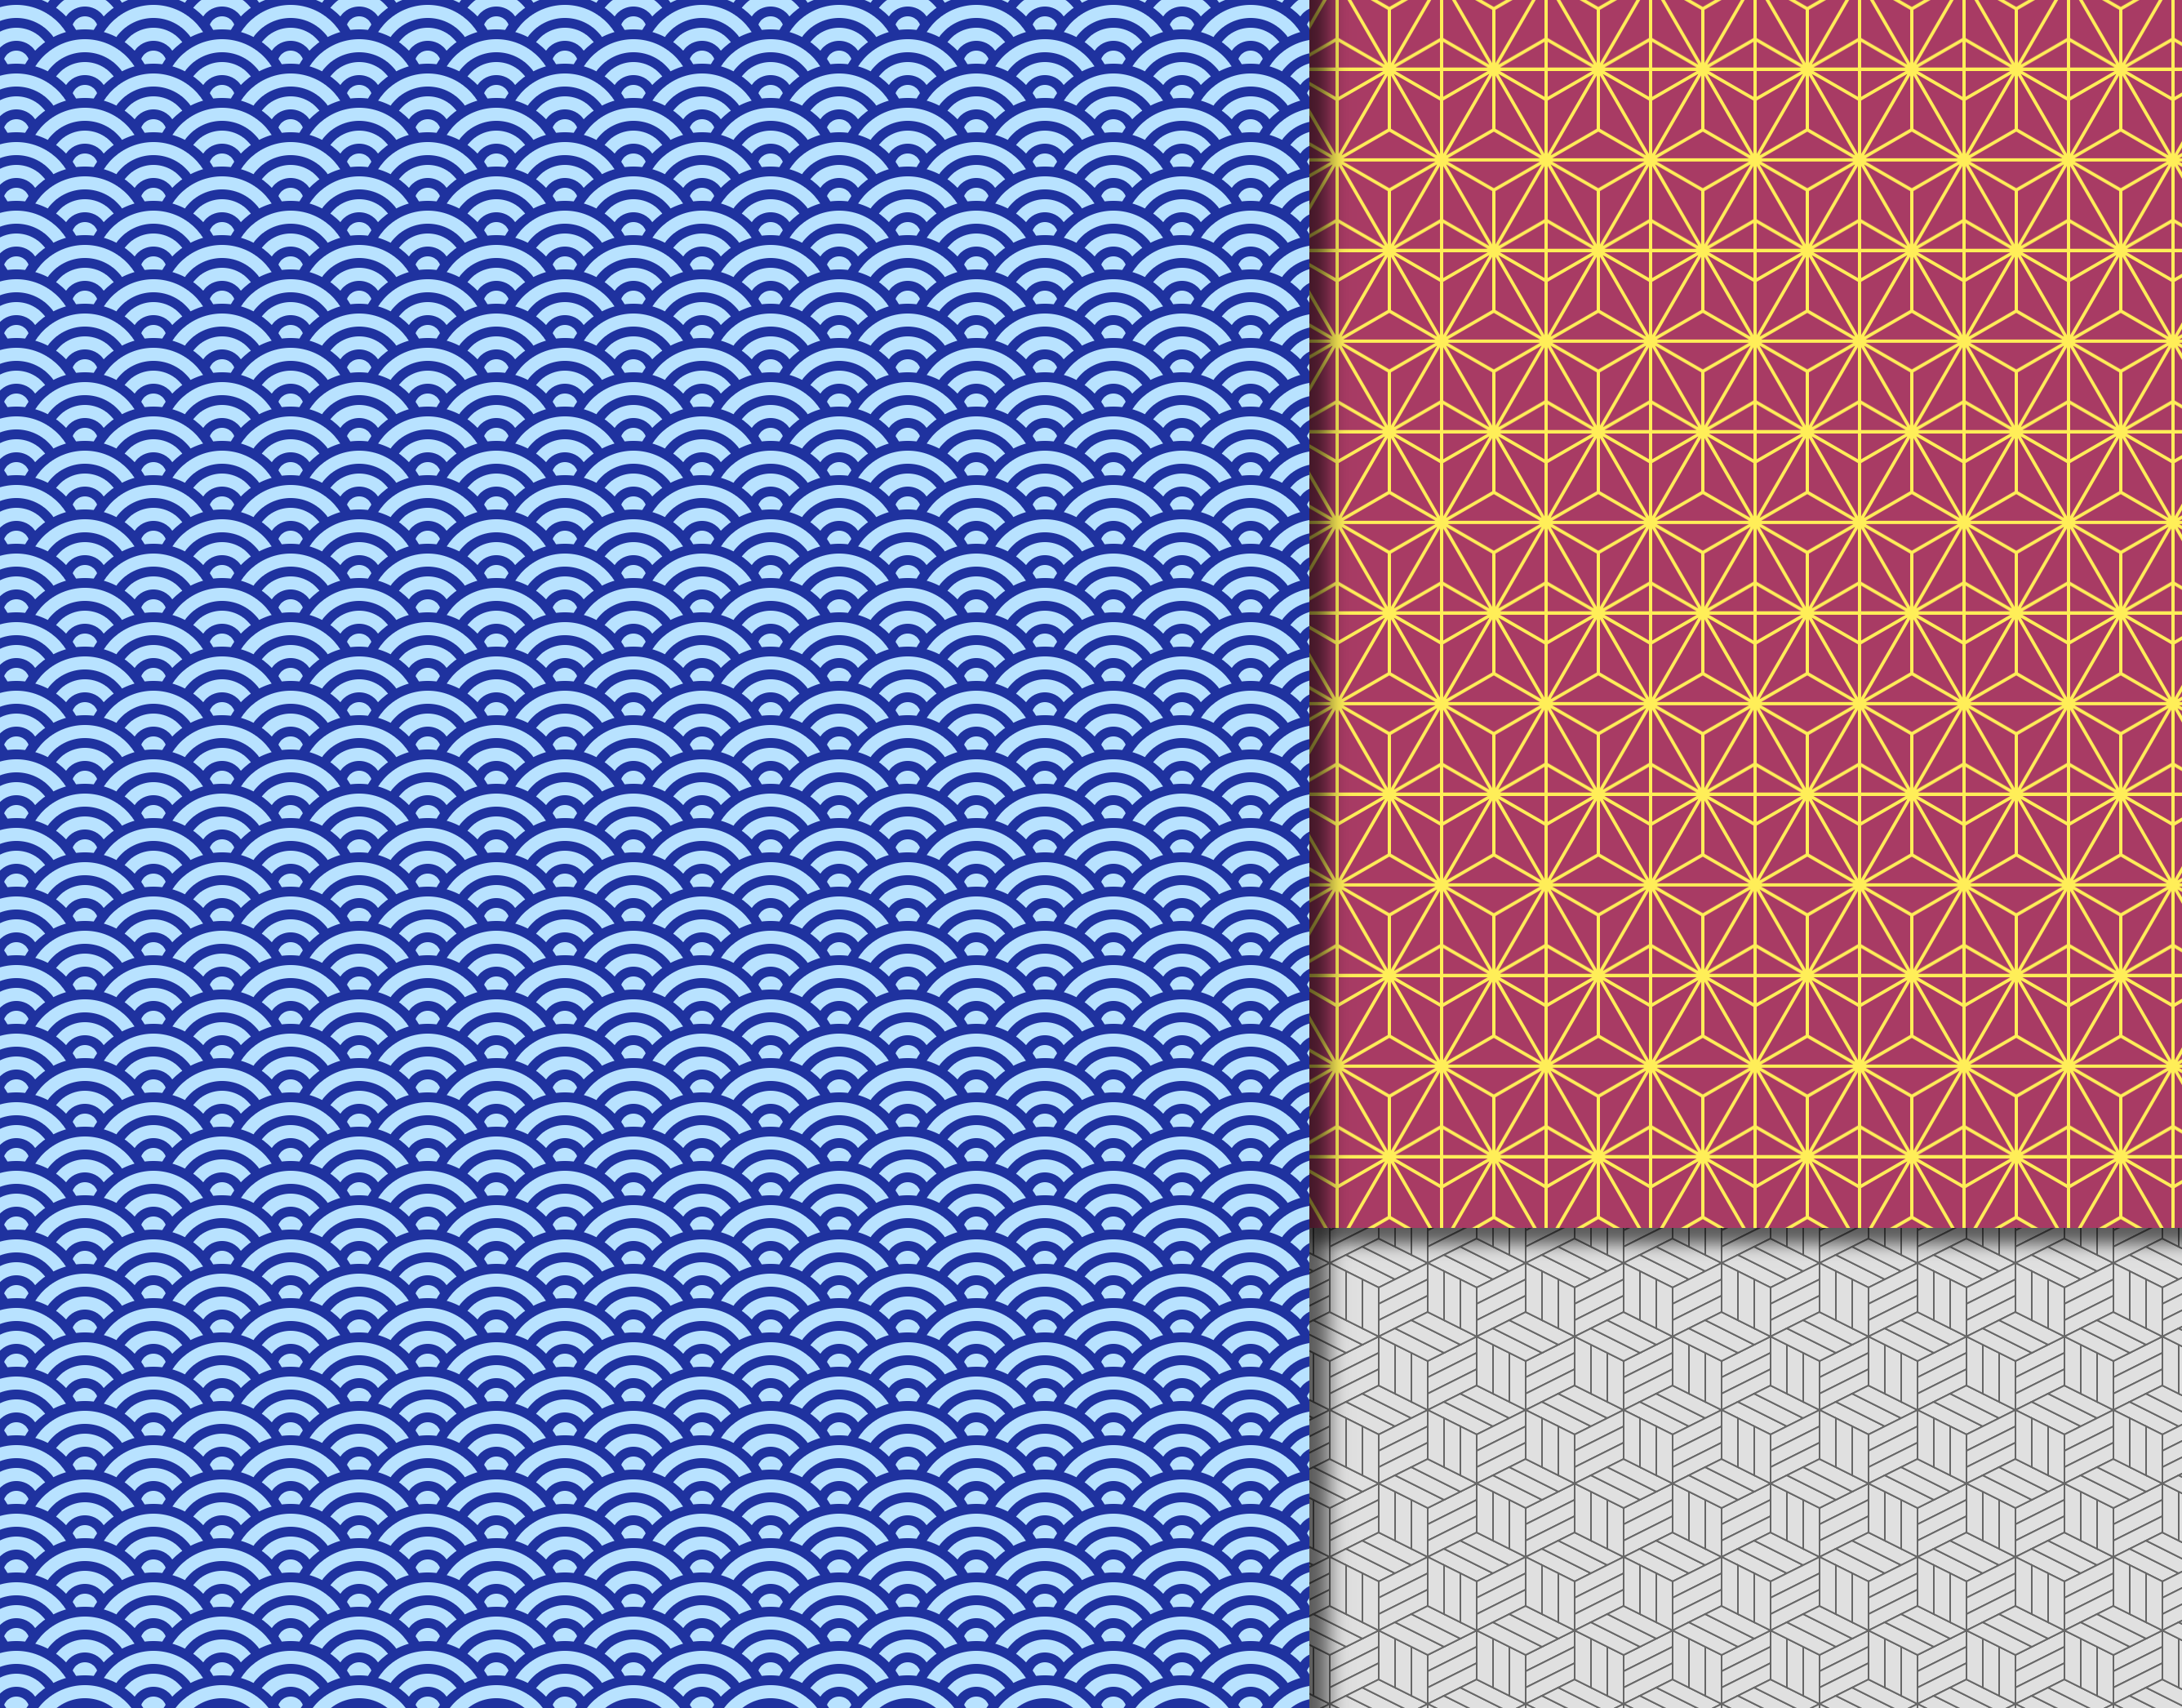
Ik had achtergronden nodig met behangpatronen die je naadloos naast elkaar kunt plakken zoals bijvoorbeeld deze:
Er genoeg voorbeelden te vinden als je zoekt op iets als ‘seamless pattern images’. Als de licentie het toestaat, kun je ze als achtergrond gebruiken van bijvoorbeeld een Gutenberg Groupblock of Coverblock. (In de instellingsdialogen voor de achtergrond van deze blokken kun je aangeven dat de afbeelding niet moet worden opgerekt maar als tegels vullend naast elkaar gelegd, resulterend in daartoe strekkende CSS background-size en background-repeat regels).
Dit soort patronen wil je naar eigen smaak aanpassen: kleur, lijndikte, vorm, omvang van het herhaalde basiselement, etc. Je kunt natuurlijk ook zelf iets tekenen/maken in bijvoorbeeld Illustrator of Inkscape (die laatste heeft de voorkeur ivm de opvattingen over geestelijk eigendom die Adobe zijn gebruikers laat onderschrijven). Er zijn ook online generatoren te vinden die dit soort patronen voortbrengen (voeg de woorden ‘online generator’ toe bij het zoeken).
Hoe dan ook zou het beter zijn als je deze functionaliteit binnen de WordPress blockeditor hebt. Dan hoef je niet steeds te schakelen tussen de generator en WordPress en je hoeft niet steeds patronen te down- en uploaden ( en daarbij eventueel nog exporteren naar een bruikbaar formaat). Hiermee zou je bovendien de gebruiker die dit allemaal te omslachtig vindt van dienst kunnen zijn als deze nieuwe of aangepaste patronen nodig heeft.
Wat dus eigenlijk wenselijk is, is zo’n online svg-patroongenerator, maar dan als onderdeel van de Gutenberg editor. Om dit te bereiken doorliep ik een aantal stappen waarbij ik om te beginnen uitging van onderstaand achtergrond-patroon:
Het patroon op de achtergrond van dit venster heet Asanoha in Japan, wat hennep betekent. Het lijkt eigenlijk niet op een hennepblad maar dat maakt het niet minder fraai. En trouwens, wie ziet er nou twee vissen in het gelijknamige sterrenbeeld?
Met dit patroon in gedachten doorliep ik de volgende acht stappen:
SVG Maken
JSON maken
JSON doorgeven aan Block Editor
Extra functies toevoegen
Inspector Controls toevoegen aan de block-editor
Renderer maken met template, parameters en functie-resultaten
Voorinstellingen
SVG in de achtergrond van het blok plaatsen
Ten slotte maakte ik wat extra patronen met verschillende voorinstellingen van de parameters. Aan het eind staat daarvan een overzicht.
1. SVG Maken
Het Asanoha patroon is een herhaling in horizontale en verticale richting van de volgende basisfiguur:
De onderste helft is hierin dan weer het spiegelbeeld van de bovenste.
De afmetingen worden bepaald door slechts 1 parameter: de breedte. De hoogte is √3 x de breedte.
Daarnaast kun je variëren in lijndikte, lijnkleur en vulkleur en die komen dus als te wijzigen parameter in aanmerking.
Hieronder staat de SVG met een breedte van 80px, een lijndikte van 2px, #FFFFFF als lijnkleur en #000000 als achtergrondkleur:
Om de waarde van de parameters te kunnen aanpassen in de WP block-editor, maakte ik een JSON object dat aan de block-editor kan worden doorgegeven. Hierin worden de parameters gespecificeerd en ook wordt hierin deze svg als een template doorgegeven zodat de block-editor van parameters en template samen een svg kan maken.
De templates waren vooralsnog zo eenvoudig dat een aparte template-engine eigenlijk niet nodig leek. Ik maakte een simpele renderfunctie die met een enkele regular expression parameter-waarden afkomstig van de block-editor in de template kon plaatsen. Niet uit sluiten valt dat in een later stadium gebruik van een wat geavanceerder template-engine de moeite waard zal blijken te zijn.
Om later nieuwe patronen toe te voegen, plaatste ik het JSON object in een bestand in een aparte map in de plugin directory: svg-tpl.
4. Functies toevoegen om te rekenen met parameters
De Blockeditor beschikt nu over een specificatie van de parameters en een template voor de SVG. Maar om de SVG te kunnen maken, moeten behalve de parameters ook hier en daar waarden kunnen worden gebruikt die van die parameters worden afgeleid. Zoals gezegd is bijvoorbeeld de hoogte van Asanoha-svg gelijk aan √3 * dx ( de breedte parameter ).
Daarom wordt aan de block-editor ook een property met javascript functies doorgegeven. In het geval van de hoogte van het Asanoha basiselement wordt de functie view.fuctions.svg_height doorgegeven waarmee de hoogte op basis van dx kan worden bepaald. Bij het evalueren van de functie wordt het geheele json-object ook zelf doorgegeven als parameter ‘data’ zodat de functie toegang heeft tot alle parameters in het JSON object:
5. Inspector Controls toevoegen aan de Block-editor
Nu het JSON object duidelijk kan maken welke Inspector controls kunnen worden ingesteld, kan de edit-block functie worden gemaakt.
Hierin wordt als eerste een selectbox gevuld met als opties de namen van alle json bestanden die er in de map svg-tpl zijn gevonden. Ik begon met alleen ‘Asanoha’ maar het is uitdrukkelijk de bedoeling dat er een aantal andere bijkomen. Op basis van het in deze selectbox geselecteerde json object worden vervolgens controls toegevoegd aan het panel in de Gutenberg Inspector controls. De parameter ‘dx’, zoals die in asanoha.json wordt gedefinieerd, heeft als type ‘range’. Dit betekent dat de edit-functie een RangeControl aan het panel toevoegt. Andere properties van ‘dx’ worden gebruikt om de RangeControl nader in te stellen, bijvoorbeeld minimum en maximum waarde.
Behalve het type ‘range’ herkent edit.js op dit moment de types ‘string’, ‘select’ en ‘colorpanel’. Daarmee kunnen overeenkomstige controls worden toegevoegd. Als het type niet herkend wordt, wordt het genegeerd.
Zie: src/edit.js op Github
6. Renderer maken voor template, parameters en functieresultaten
Als de benodigde parameters zijn ingesteld kan met de functie renderTemplate de uiteindelijke svg worden gegenereerd. Aanvankelijk leek een template engine als Moustache voor de hand te liggen maar desgevraagd stelde Copilot een simpele regex voor die inderdaad vooralsnog voldoet. Omdat deze renderfunctie het niet kan herkennen als er een functie wordt opgegeven in plaats van een simpele variabele worden de functieresultaten in expliciet in een tussenvariabele geplaatst zodat bij het renderen alleen variabelen hoeven te worden vervangen en geen functies geëvalueerd.
Zie: src/templating.js op Github
7. Voorinstellingen
Ik heb de JSON objecten van de patronen uitgebreid met een property ‘presets’, een array waarin met groepen voorinstellingen van de parameters. Het laat zien dat kleine veranderingen in de parameters tot ingrijpend ander aanzien van het patroon kan leiden. SVG’s die deze presets hebben krijgen een extra select-box in de Inspector Controls.
Zie: src/edit.js
Ter onderscheiding gaf ik de groepen voorinstellingen een naam. Meestal net zo vergezocht als Asanoha.
8. SVG in een block plaatsen
Wat moet er na het renderen met de svg gebeuren? SVG’s kunnen op verschillende manieren in een webpagina worden opgenomen. In principe zou de svg als bestand kunnen worden opgeslagen ( in bijvoorbeeld wp-uploads/ ) en dat bestand kan dan als achtergrond-afbeelding worden geselecteerd. Dit is evenwel niet zonder problemen want WordPress staat zonder aanpassing de upload van Svg’s niet toe.
Maar een SVG kan ook in de lopende html worden opgenomen en zelfs als achtergrond-afbeelding door een inline css styleregel als hieronder. Dit scheelt overigens ook een extra request aan de server.
Door de svg om te zetten naar een inline-styleregel kan deze in de edit- en in de save-functie aan de blockProps van het Gutenberg block worden toegevoegd.
// get the resulting svg by rendering the template and parameters
const svgResult = renderTemplate( mytemplate, myview );
// URL encode the svg
const svgDataUri = `data:image/svg+xml,${ encodeURIComponent(
        svgResult
) }`;
// Add the encoded svg as an inline css background rule
blockProps = useBlockProps( {
        style: { backgroundImage: `url("${ svgDataUri }")` },
} );
Het aanpassen van parameters zal hierdoor onmiddellijk resulteren in een aangepaste CSS achtergrond stijl zodat de Block Editor gelijk de achtergrond aanpast. Zoals de bedoeling was.